Friday, 5 December 2008
My environment animations
Well animating this was surprisingly easy, Maya said no to me when I tried to upload the sky dome coloured environment file, so I had to open one of my earlier files and rotate the propellors to where they are now currently facing. I had the farmes spaced out so that it would rotate slowly, which I'm proud of. The same principle is with the doors, I also tried to provide a little alteration in movement with them. One more thing about this, there was a issue with rotating the doors. When I rotated it first time the door moved as though it wasn't on any hinges, I realised that this is because the pivot of the rotate tool was placed in the middle, so I moved the pivot point (by pressing insert on the keyboard) and moving it to the middle but where the hinges would be placed. This worked successfully, thank God.
Booyashacka

Well here I am, Sam's background turned out pretty well. Anyways now I'm gonna tackle Maya, whish me luck ^_^!
Thursday, 4 December 2008
So many me's....


Jeeze I hate photos my, nose is like a brick....thanks a lot Dad! Anyways let me know which one looks good for the final shot. Just imagine my pic being shot and my name pops up. Damn my nose is big -_-.
Tuesday, 2 December 2008
WANTED (No not the movie)

Well guys, since we are considering putting our pictures as an opening or credits as wanted posters, I did a little experiment tutorial, so here we go. First here's my picture. Make sure you double click on the background layer to unlock it, call whatever you like.
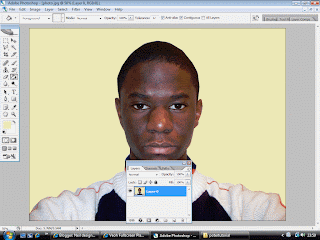
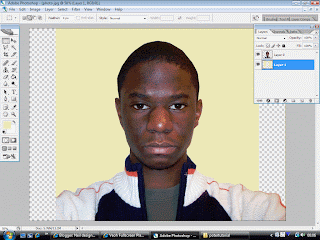
Cut around your pic then, delete it. Next you colour the cut out selection, MAKE SURE YOU CREATE A NEW LAYER for the colouring, if you want to change the colour. Next use the rectangular marquee tool to cut the edges.
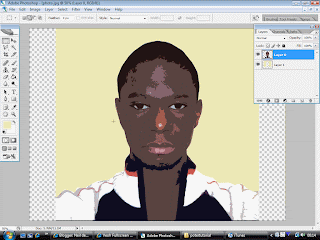
Alright to get this, go to filter at the top, then go to artistic, then cut-out. Mess around with the edge simplicity, edge fidelity and number of levels. I only touched number of levels and put it on number 5 because It brings out those highlights and I plan to cut them out.

Alright to get this, I used the magic wand tool to select all those highlights, including some on my jumper. MAKE SURE YOU ARE ON YOUR LAYER PICTURE. Afterwards go to image-adjustments-Hue/Saturation. Slide the Saturation all the way to -100. Use the magic wand tool to select the dark areas and the colour them black. It's optional though. Which you think looks better?


Subscribe to:
Comments (Atom)